Why you will dig sourdough bread recipes
Here are a few reasons you will find this loaf so satisfying and simple to make in your own kitchen.
- The tangy flavor will make every bite feel fresh and alive inspiring you to bake again with just flour water and salt
- The slow fermentation process helps break down gluten making the crumb easier on your stomach and more flavorful
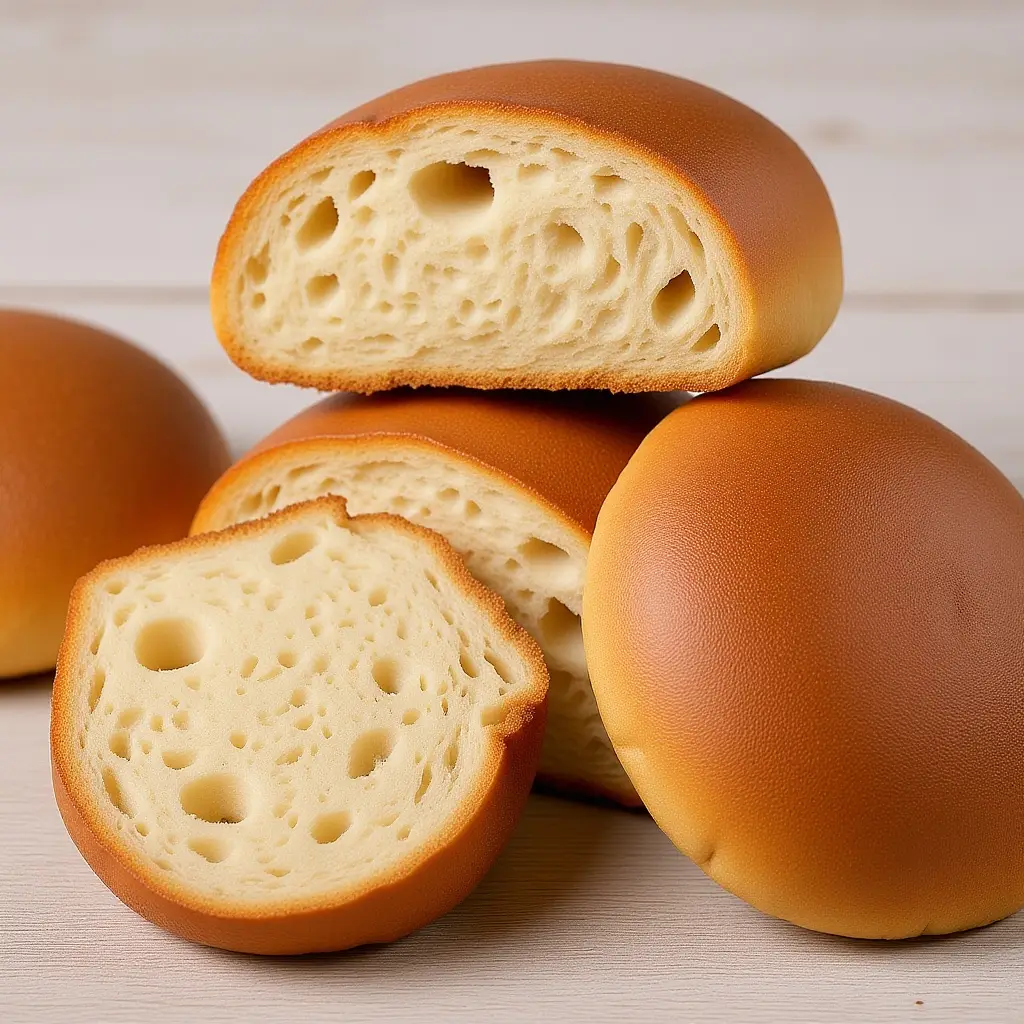
- The crust turns out crisp and crackly giving you that classic rustic bakery style with a soft tender interior that you can slice thin or thick
- You need only a handful of pantry staples and a bit of time so even a busy home cook can fit it into weeknight routine
Key items for the loaf
Before you start gather these core ingredients that give this rustic style loaf its deep flavor and structure Each ingredient plays its part from developing taste to creating that eye catching crust you love
- All purpose or bread flour choose a high protein version to form strong gluten strands that trap the gas for an airy crumb I sometimes add a touch of whole wheat for extra flavor
- Active sourdough starter fed eight to twelve hours ahead to ensure it is bubbly full of natural yeast and bacteria This living culture defines the tang and gives lift in this fermentation process
- Filtered lukewarm water is best because it wont shock the starter I aim for around seventy five degrees to help the dough rise on schedule
- Fine sea salt balances the tang helps control hydration and slows fermentation enough to develop flavor It also strengthens gluten so the crumb stays soft but not gummy
- Optional seeds or grains like sunflower flax or sesame give a nutty aroma add nutrition and visual appeal Just gently fold some in or sprinkle on top before baking
- Heavy lidded oven proof pot such as a Dutch oven holds steam locking in heat for a shiny crisp crust This practice mimics professional bakery technique in your own oven
- Bench scraper or sharp lame helps you handle and score the dough easily Scoring guides the expansion creating that signature ear on the crust
Fast steps and why they matter
Here are quick steps and why they matter so you know each action has a purpose in building texture and taste
- Step one mix ingredients Combine bubbly starter flour water and salt in a bowl Stir until almost all dry bits are wet Then let it rest Ten minute rest helps start gluten formation
- Step two stretch and fold Every thirty minutes reach under the dough gently pull and fold over This strengthens the crumb without intensive kneading and adds air pockets
- Step three bulk fermentation Cover the bowl let the dough rise at room temperature for three to four hours You will know it is ready when it doubles in size
- Step four shape the loaf Turn the dough onto a floured surface Pull edges toward the center to create tension The tension gives structure so the loaf holds its shape
- Step five second rise Place shaped dough in a proofing basket or bowl lined with cloth Let it sit for about sixty minutes This final proof gives the loaf height and volume
- Step six preheat your oven Heat your oven to four hundred fifty degrees Fahrenheit with a heavy pot inside High heat and steam lock in a golden crust
- Step seven bake with steam Gently transfer the dough into the hot pot Cover and bake for twenty minutes Then remove the lid and bake ten more minutes This creates a crisp crackly crust
Each of these steps helps create airy crumb chewy texture and a crust that shines like it came from a bakery
Smart time saving tips
Over the years I have learned a few hacks that cut down wait time and keep this bread baking method fun Here are my favorite shortcuts for more loaf and less fuss
- Keep your starter ready by feeding it twice a week Use a 1 to 1 ratio of flour and water in a clean jar Stir well and leave at room temperature Feed again within twelve hours for a strong bubbly starter
- Find a warm quiet spot like the top of the fridge under a lamp or near a sunny window Gently warmed dough ferments faster This can reduce bulk rise time by an hour while still building that classic tangy flavor
- Mix for a minute on low speed with a stand mixer then finish by hand This combines ingredients quickly but still lets you feel the dough texture Avoid overmixing by stopping when it forms a smooth ball
- Shift bulk fermentation to overnight in the fridge This slow cold ferment enhances taste and texture While you sleep the dough develops depth You can shape and bake in the morning for fresh bread before breakfast
- Use a proofing box or create a DIY version inside your oven with a bowl of hot water This gives steady gentle heat for second rise and removes the guesswork So you get perfect proof each time
That first bite moment
My friend Jess came by on a dreary Tuesday when I had just slid that loaf out of the oven She sniffed the air then asked if I had uncovered a secret I just shrugged and handed her the first slice
Jess took a bite and her eyes lit up She said the crust crackled with a sweet tang and the interior felt pillowy soft I told her it was nothing fancy just flour salt water and a bit of time She laughed and asked how I made it taste so much like a bakery you pay good at for a loaf
In that quiet kitchen moment with crumbs on the counter I realized how these sourdough bread recipes bring people together Over simple conversation and a shared snack we felt closer The joy of a first bite turned a normal day into something special and reminded me why I keep going back to this cooking method in my home kitchen
Later my kids came running back for more They argued over who got the heel slice and I just smiled It was a reminder that a bit of effort and a slow fermentation are worth every minute
Cool ways to plate it
Once you have that perfect loaf you can serve it in so many fun ways Here are a few ideas that add flair without extra effort
- Slice thin and serve with olive oil balsamic vinegar and a sprinkle of sea salt The simplicity lets the crust and crumb shine with each dipped bite
- Toast thick slices then top with smashed avocado cherry tomatoes and a squeeze of lemon juice This bright combo works as a quick lunch or a light brunch across all cuisines
- Make a rustic open faced sandwich with shaved turkey crisp lettuce and a swipe of mustard For a Mediterranean hint add cucumber slices and feta crumbles for extra tang
- Create a sweet treat by toasting and slathering butter and jam or honey The warm crumb soaks up the spread and gives you a cozy moment any time of the day
- Use cubes of the bread to make panzanella salad Toss with fresh herbs tomatoes and cucumbers The chewy chunks soak up dressing for a satisfying side dish that feels fancy but is easy
Keeping and heating tips
When you have leftover slices you want to keep that crust crisp and crumb soft I have a few storage tricks so you can enjoy fresh taste even a day or two later
For short term stash wrap the loaf loosely in a clean cotton kitchen towel then place it on the counter away from direct sunlight This setup lets the crust breathe so it stays crisp while the crumb stays soft Most people finish the loaf in twenty four hours this way
If you need to store it longer up to three days slice the loaf and place slices in a resealable plastic bag Press out as much air as you can then seal and leave at room temperature The crumb stays moist and the crust still holds shape for easy snacking

For longer storage freeze slices by standing them upright in a freezer safe bag Then pull out slices as you need them No thawing needed just pop into the toaster or oven and you have almost fresh tasting bread
To reheat a slice preheat your oven or toaster oven to three hundred fifty degrees Place the slice on a wire rack for five to seven minutes This brings back that crackle in the crust without drying the crumb
For a whole loaf flash reheat wrap it in foil and warm at three fifty for ten to fifteen minutes Let it sit for five minutes before unwrapping This method also helps the flavors settle giving you a richer taste with each slice
Feel good wrap and top questions
At the end of the day I find that baking my own sourdough loaf transforms a simple kitchen moment into a source of pride and comfort I have shared here the steps and tips I have learned so you can try these sourdough bread recipes in your own home Whether you are just curious about fermentation or you are seeking rich crust and tangy crumb this method is approachable The key is to respect simple ingredients flour water salt and a lively starter and to give the dough the time it needs Trust the process and you will be rewarded with slices that taste like they came from an artisan bakery Then you can share that joy with friends and family and maybe create your own first bite story too This cooking method is forgiving and you can tweak hydration or proof times to match your schedule Over time you will learn how your kitchen environment plays a part and you can build confidence that you can rely on for weekly baking
How long can I keep the loaf at room temperature
A fresh loaf wrapped loosely in a towel will stay crisp on the outside and soft inside for twenty four hours After that wrap in plastic for a day more but the crust will soften over time
Can I use all whole wheat flour instead of white flour
You can swap some or all white flour for whole wheat but the loaf may be denser and rise less If you want lighter crumb try a blend of eighty percent white flour twenty percent whole wheat
What if my sourdough starter is not very active
Feed your starter twice at room temperature before using It may take a few extra hours to get bubbly If needed use a pinch of active dry yeast to boost initial rise and then transition back to pure starter
Why is my crust not getting crisp
Make sure you bake with steam and at high heat Use a heavy lidded pot or add a pan of water in the oven Steam locks in moisture so the crust can burst and crisp Once you remove the lid bake a few minutes longer
Can I freeze the whole loaf instead of slices
Yes wrap the whole loaf tightly in plastic and foil Freeze for up to a month To reheat thaw at room temp then warm in foil at three fifty for ten to fifteen minutes for best texture
Sourdough Bread Recipes
Ingredients
Equipment
Method
- In the large mixing bowl, combine the sourdough starter and lukewarm water. Stir to dissolve the starter. Add both flours and mix until there are no dry spots, forming a shaggy dough. Cover the bowl with a damp towel and let rest for 30 minutes (autolyse).
- Sprinkle the salt evenly over the dough. Gently fold and knead the dough in the bowl for 2-3 minutes to incorporate the salt.
- Let the dough rise at room temperature for 4-5 hours. During this time, perform 3 sets of stretch-and-folds every 30 minutes: grab one edge of the dough, stretch it up, and fold it over onto itself. Turn the bowl and repeat on all sides.
- Dust the countertop with flour. Turn the dough out, divide it in half with a dough scraper, and gently pre-shape each piece into a ball. Let rest uncovered for 20 minutes.
- Shape each ball into a tight round loaf. Place each loaf seam-side up in a well-floured proofing basket or bowl lined with a floured towel. Cover and let rise for 2–3 hours at room temperature or refrigerate overnight for up to 14 hours.
- Preheat your oven to 230°C (450°F) with a Dutch oven inside, for at least 30 minutes. When ready to bake, turn a loaf out onto parchment, and score the top with a sharp knife or lame.
- Carefully transfer the loaf (with parchment) into the hot Dutch oven. Cover and bake for 20 minutes. Remove the lid and bake for another 25 minutes until deeply golden and crusty.
- Let cool completely on a wire rack before slicing, which should take about 1 hour.