Sunlight would drift through the screen door onto the worn boards of Grandma Rosa’s porch every summer morning. That was when she called me in to help shape the dough for our family favorite cheesy pull apart bread. I can still hear the soft scrape of her wooden spoon against the iron skillet as she warmed up the butter. My fingers got sticky on the olive oil and I thought I’d never get each little roll even. But somehow we did, and I got to tuck in a chunk of cheese just right before the oven sang hot and steady.
The scent of baking bread would drift down the lane and Cousin Clara would come running in with her braids bouncing. The cheesy pull apart bread was just a story waiting to be told in each bubbling pocket of cheese. It was my first lesson in patience and rewards. It also was what taught me that cooking is more than just feeding hungry tummies it is holding close the warm comfort of home.
Pantry Standbys
Whenever I reach for ingredients I picture Grandma Rosa lining up jars on her shelf. Flour that lent a gentle chew meets yeast that gave our dough a soft rise. Then there was the salt that coaxed out flavors kind of like a gentle whisper in every bite of cheesy pull apart bread. Olive oil made the crust gleam in the oven and butter came next to make each bite richer than the last.
And then cheese of course melted right through every layer. It was never fancy cheddar only it might be a mix of mozzarella and sharp cheddar at times. You can even tuck in some garlic powder or fresh herbs from your garden to make your own spin on cheesy pull apart bread. I promise it will take your heart right back to those summer mornings.
Why You Will Cherish This Recipe
- Simple Comfort You only need a handful of pantry staples that you probably already have on hand.
- Hands On Fun You get to rip and shape the dough feel every piece go together and get a little messy.
- Melty Goodness That cheese oozes from every nook and cranny making each bite a little surprise.
- Family Bond It brings everyone around the table from little siblings to cousins like Tom.
- Versatile Base Swap cheeses or add herbs or spices to match your mood and season.
Steps to Golden Cheesy Pull Apart Bliss
Step 1 Prepare the Dough In a big bowl stir warm water sugar and yeast. Let it sit until it froths that is when I know it is ready. Then mix in flour salt and olive oil until the dough holds together. Knead it on a floured board until it feels smooth but I often stop before it is perfect because that feels more like Grandma taught me.
Step 2 Rest and Rise Cover the dough with a damp towel. Set it by the window or near a warm spot until it doubles in size that takes about one hour. I sometimes chat with my brother Jack or cousin Tom while we wait it makes the time feel shorter.
Step 3 Shape the Pieces Punch down the dough and break it into little balls. I aim for bite sized or a bit bigger so that each chunk of cheesy pull apart bread melts nicely. Coat each ball with melted butter or olive oil so they stick together in the pan.
Step 4 Layer the Cheese Grab your favorite cheeses and tuck a small cube or sprinkle between layers of dough balls. I remember Grandma Rosa smiling when she saw me trying too big a chunk it made the bread burst at the seams.
Step 5 Bake with Care Heat your oven to a moderate temperature so the outside turns golden but the inside stays soft. Place the skillet or baking dish in the center rack and watch through the glass window. The cheese should bubble gently in about twenty five minutes but ovens can vary.
Step 6 Final Touch When it is done brush the top with more butter or olive oil and sprinkle fresh parsley or garlic powder. Let it cool just enough so you dont burn your tongue but still pull apart those pieces while they are warm.
Grandma Rosa Wisdom
- Always Preheat Early She said skip a chill in the oven by starting heat early so your cheesy pull apart bread rises evenly every time.
- Dont Rush the Rise A slow rise makes a fluffier crumb she whispered that more waiting equals more flavor actually.
- Butter on Top A generous brush at the end gives a golden shine and keeps the crust tender and soft.
- Listen to Your Nose Whenever it smells toasty that is your sign to peek in and check if your cheesy pull apart bread needs a few more minutes.
Cousin Clara Nods
I set a plate of warm cheesy pull apart bread in front of my cousin Clara who always has a grin ready. She picks at the corners first finding those edges where cheese meets crust and says it tastes like sunshine and laughter at the same time. Her cheeks puff out when she bites in meaning she likes it best fresh from the oven.
Then my Aunt Mary and my brother Jack circle around and each takes a little ball from the center. We all share crumbs and stories and everything feels lighter. That is when I know I have made more than just bread I made a moment worth stealing for memories.
Setting the Board Just So
A well set table makes this simple recipe feel like a feast. I place the cheesy pull apart bread on a wooden board or cast iron skillet right in the center. Around it I add small bowls of dipping oil that is garlic infused or red pepper flakes in olive oil, and sometimes I include a bowl of roasted carrot hummus for extra variety. A few sprigs of fresh basil or rosemary scattered nearby make the whole table smell like a garden.
Napkins get folded or rolled with a sprig of herb tucked in the fold. Plates and knives are laid at each spot so everyone can pull their own piece. I light a little candle or two so the flicker bounces off the cheese and crust as we laugh together.
Twist with Nature
- Spring Herbs Stir in fresh chives parsley or dill for a bright pop in your cheesy pull apart bread.
- Summer Veggies Dice sun ripe tomatoes or zucchini and place between dough layers for a garden fresh bite.
- Autumn Spice Add a sprinkle of nutmeg or cinnamon sugar on top for a sweet savory twist that warms the soul.
- Winter Warm Up Fold in chopped roasted garlic or a blend of fragrant winter herbs to cozy up your cheesy pull apart bread with a hearth side feel.
Storing and Warming With Heart
Once you have filled everyone up save any leftover cheesy pull apart bread in an airtight container or wrap it in foil. I usually tuck it into the fridge if I know we will finish it the next day. The cool keeps the cheese from seeping out too much but it holds in the moisture.
When you are ready to reheat slide it into a warm oven or even a toaster oven set at a low temperature. Heat for about ten to fifteen minutes until the cheese softens and the crust warms again. You can brush more butter on the top before you pop it back in so each piece stays tender just as if it was fresh out of the oven.
You might feel the urge to microwave a quick piece but the oven gives the best crisp soft contrast that makes your cheesy pull apart bread feel new again. Just dont let it sit too long or the crust will start to harden. Keep it wrapped and warm until the last bite.
Raise a Glass and Questions Answered
As the day winds down I raise a simple glass of iced tea or sparkling water to the table. Everyone has crumbs on chin and that sticky cheese on fingertips and we smile at the chaos. This cheesy pull apart bread recipe is what carries our hearts back to that screen door porch with Grandma Rosa smiling. It is a promise that food can stitch generations with each warm mouthful.
Q What type of cheese works best I like mixing mozzarella with sharp cheddar for stringy melt and bold flavor but feel free to try gouda or fontina.
Q Can I make dough ahead of time Yes you can make it the night before and let it rise slowly in the fridge then shape in the morning just before baking.
Q What if I dont have a cast iron skillet A simple baking dish or cake pan will work as long as it is oven safe you will still get that golden crust.
Q How do I keep the bread soft all day Store it in a lightly sealed container so a little air can circulate that stops the crust from going soggy.
Q Can I freeze the leftovers Absolutely wrap each piece in plastic wrap and store in a freezer bag then thaw and reheat in the oven.
Q Is it okay to add toppings on top Yes you can sprinkle extra cheese or herbs after baking to make each piece look and taste special just before serving.
Cheers to family to the warmth of home and to the next time we gather to pull apart that next batch of cheesy pull apart bread together.

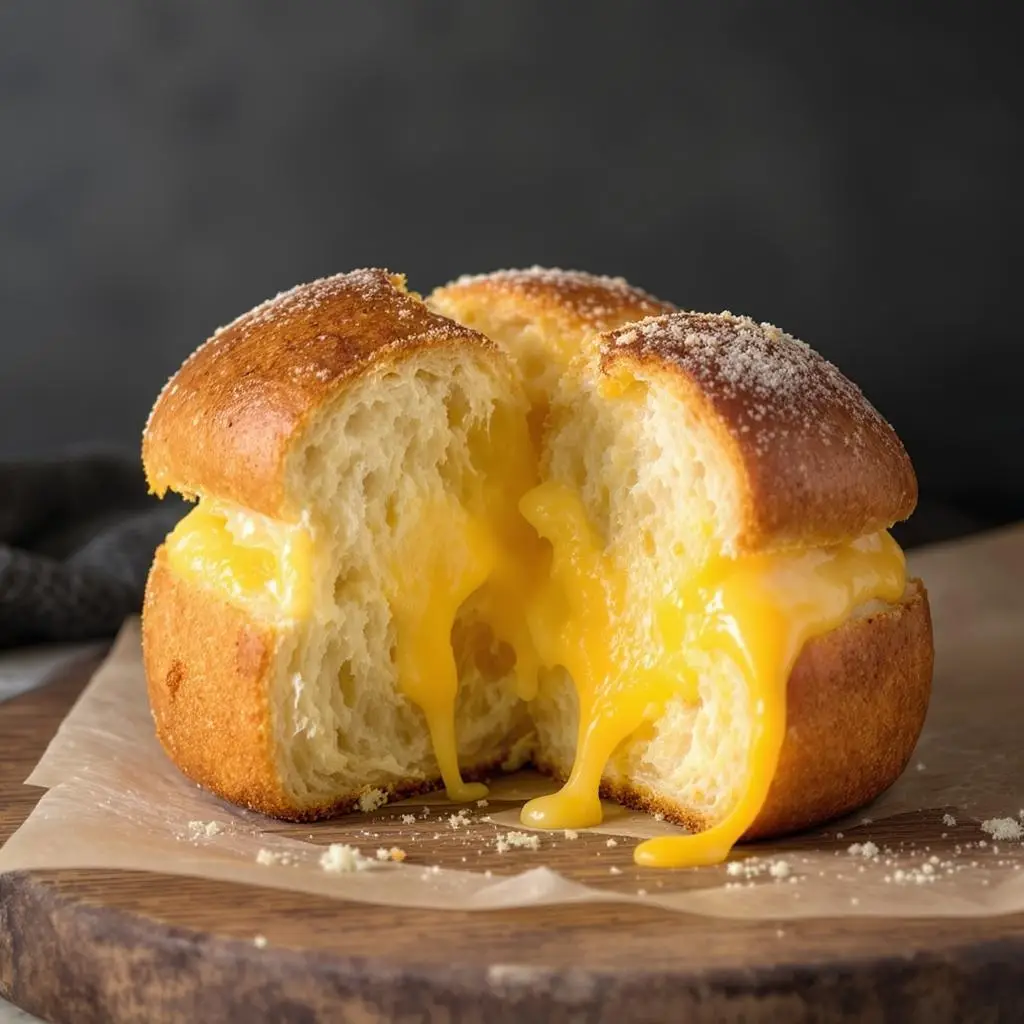
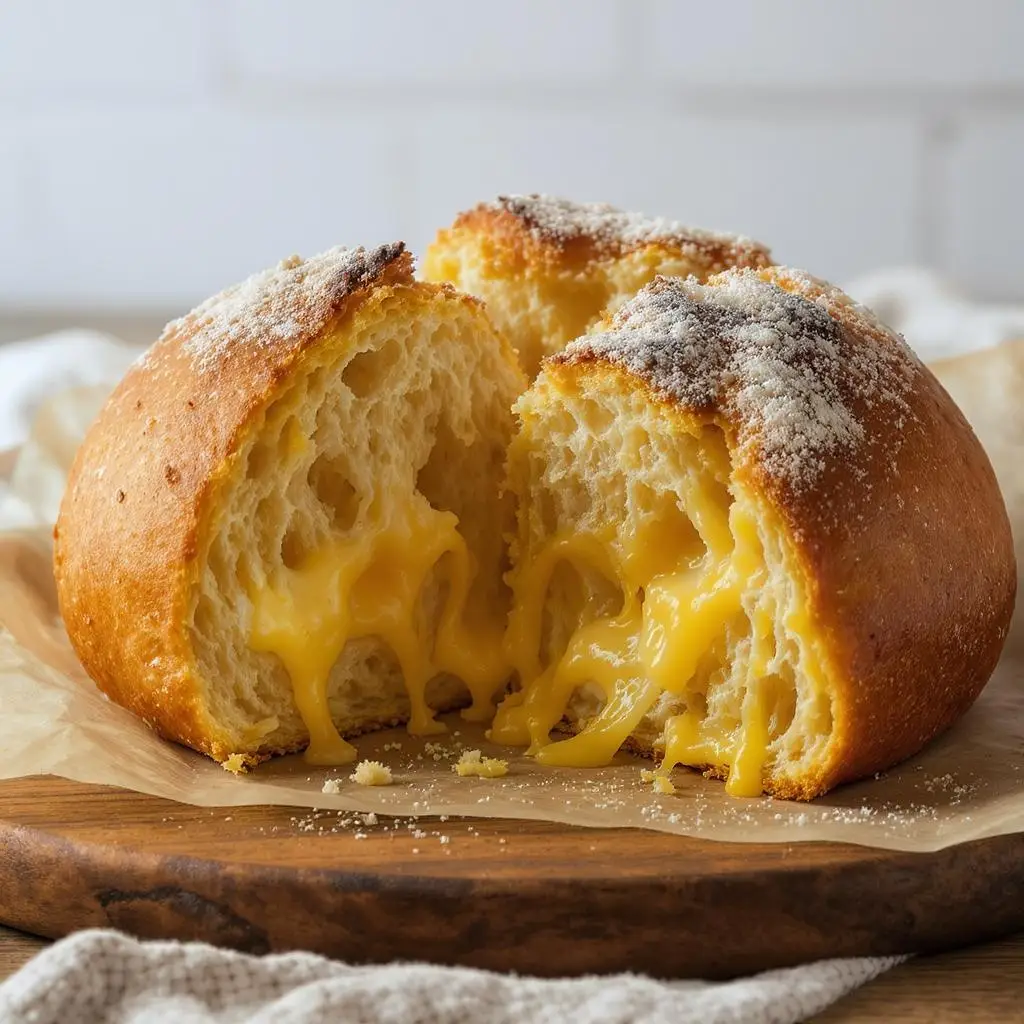
Cheesy Pull Apart Bread
Ingredients
Equipment
Method
- Preheat your oven to 180°C (350°F).
- Place the sourdough loaf on a cutting board. Using a sharp bread knife, cut 2cm wide slices across the loaf, stopping before you cut through the base—repeat in the opposite direction to create a grid pattern, but keep the bottom intact.
- In a small mixing bowl, combine the melted butter, minced garlic, chopped parsley, salt, and black pepper.
- Gently separate the bread cubes, taking care not to break the base, and brush or spoon the butter mixture into the cracks, getting it deep into the bread.
- Stuff shredded mozzarella and cheddar evenly into all the slits in the bread.
- Place the filled loaf onto a baking sheet lined with aluminum foil. Wrap the bread loosely in another piece of foil.
- Bake in the preheated oven for 15 minutes.
- Unwrap the foil from the top and bake for another 5 minutes, or until the cheese is bubbly and the top is golden brown.
- Serve hot—pull apart and enjoy!