There is something I cant shake when I slide my skillet on the flame I fixate on the sizzle. It a simple grilled sandwich but it feels like a little science project in my kitchen. I line up my tools and ingredients like they are part of a ritual I’ve come to trust. The moment the bread meets that steamy hot surface I lean in close because I want to watch every change in real time.
I talk to myself as the crust browns I remind myself to be patient because that golden crisp is what gives a grilled sandwich its soul. My neighbor is always popping in to quiz me about temperature I sort of shrug and say it’s all about Maillard browning that happens when proteins and sugars get together under heat. Then I taste that first bite and figure out what to tweak next time.
Why Heat Shapes Flavor in a Grilled Sandwich
I can’t count how many times I’ve said that a little extra heat makes a big difference. When I crank up the stovetop the butter melts fast and the bread hits that perfect temperature for caramelization. I watch as the sugars in the bread turn a deep amber color and I know flavor is building. It feels like cooking for the thrill of seeing color change before my eyes.

It does not stop at the bread. As the cheese warms it needs its own moment to soften and ooze just enough so every bite you pull apart stretches in slow motion. I flip constantly to keep things even so the sandwich cooks low and slow without burning. It takes practice and plenty of trial but the results always make me grin.
Essential Stuff You Need to Build This Sandwich
- Bread thick cut white or sourdough works best for sturdy layers and even toasting
- Butter lots of it spread on each slice to help the Maillard browning.
- Cheese something that melts easily like cheddar or Swiss for stretch and rich flavor.
- Ham or Turkey thinly sliced meat for a quick warm up without overcooking.
- Tomato ripe but firm slices to add a little juiciness without making it soggy.
- Mustard or mayo as your spread so it layers flavor right from the first bite.
- Salt and Pepper a little goes a long way to boost every other taste.
- Optional Extras like pickles or caramelized onions for a sweet note.
Getting Everything Ready to Go
I always lay out my ingredients first so nothing gets left behind. I stick to a clean counter space with a cutting board set on a towel to catch drips. I slice my bread with a serrated knife because I like how it keeps a nice edge. Then I butter both sides of each slice right away so they are ready to hop into the pan.
Next I line up the cheese and meat in the order I want them stacked. I pat the tomato slices dry with a paper towel so the sandwich does not get wet in the middle. Finally I place my skillet on the burner and turn it to medium so it warms up gently. I find medium heat gives the right balance between slow and fast cooking.
That Moment When You Smell It
As soon as the bread touches the hot surface I get that toasty aroma wafting up. It makes me stop what I am doing and take a deep breath. The smell reminds me a bit of campfires but sweeter and buttery. That is the signature of a great grilled sandwich in the making.
When the cheese begins to melt I get another wave of smell that says melted dairy and warm bread are about to become one. It feels cozy in the kitchen like you know a delicious break is coming soon. I can hardly wait to flip it over.
Checking In Midway Through Cooking
I tap the bottom slice gently to see how firm it feels. If it’s still soft I leave it a bit longer so the butter can fully crisp up. When I see those golden brown spots I know its time to turn. I slide a thin spatula under the sandwich to peek at the underside. That little peek tells me if the heat is balanced or if I need to lower the flame.
After I flip I press down lightly with the spatula to help the top side make good contact with the pan. This also speeds up the protein rest for the cheese so it melts evenly instead of staying in a cold lump. It only takes a minute or two more for the second side to golden. Then I know I am about to lift off a perfect grilled sandwich.
Notes from the Thermometer and Toothpick Trials
Sometimes I use a thermometer to check the center if I am adding chicken or turkey that needs to hit a safe temperature. The same principle applies if I have leftover roast beef I want to reheat inside. I aim for around 160 degrees Fahrenheit in the center for those proteins. Then I let the sandwich rest for a minute off heat so the juices spread evenly.
When I dont use meat I often poke a toothpick through the middle of the cheese layer after flipping. If the cheese slides up that means it is melted through. If it is still sticky I leave it on the heat. That probe method is so low tech but it works every time. It helps me avoid a cold center.
Bringing It to the Table with Style
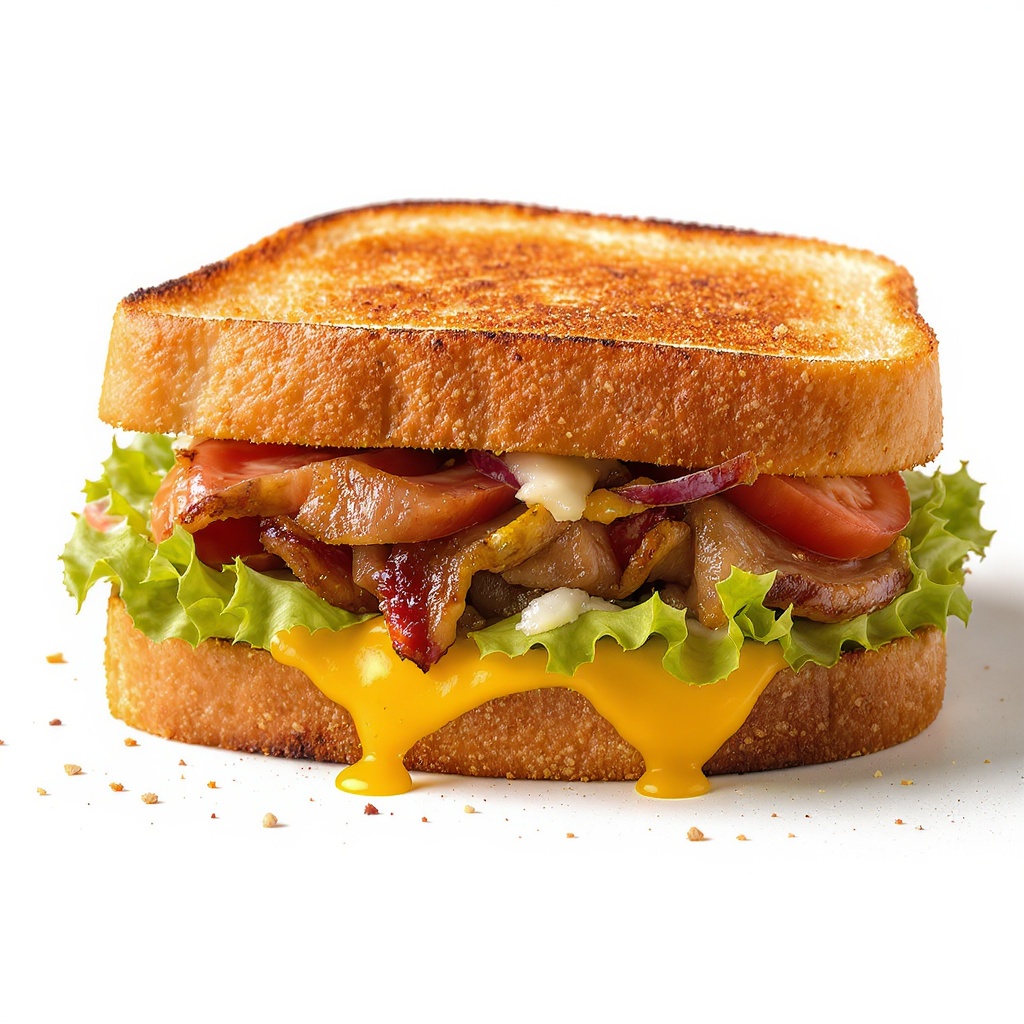
I always transfer the sandwich to a wooden board or a plate stacked with napkins. I like cutting it in half diagonally to show off the layers of cheese and meat and tomato. The angle makes the grilled sandwich look taller and more tempting.

Sometimes I sprinkle a few herbs on top for color or add a tiny pile of pickles on the side. That adds brightness and balances the richness. Then I snap a quick picture before anyone grabs a half. It looks so inviting I know people cant wait to dig in.
What to Do with Extra Slices Tomorrow
If I have leftover grilled sandwich slices I wrap them in foil after they cool a bit. The foil keeps steam inside so the cheese stays soft when I reheat it. I pop it back in a cold skillet then turn the heat to medium low and press it gently until it is warmed through.
For a different twist I shred the leftover sandwich into a pan and stir it with a slow simmer of tomato sauce. That makes a quick soup or a dip that tastes like melty grilled cheese but saucier. It also brings back a bit of Maillard browning flavor even after the sandwich is days old.
Final Thoughts plus Common Questions
To wrap this up I always say a grilled sandwich is more than bread cheese and meat it is all about heat control. Using medium fire slow and steady helps build those layers of taste. The protein rest for cheese and quick flip at the right moment unlock all that gooey richness. Now let me answer a few things I get asked most often.
What if my bread is burning too fast turn the heat down or use a different pan thats heavier. A cast iron skillet is great because it holds heat evenly.
How do I avoid a soggy sandwich pat any wet ingredients dry and use butter not mayo on the outside so it crisps up. Press lightly with your spatula to soak up any moisture too.
Can I use plant based cheese yes just pick one that says it melts well and check it a bit longer for caramelization. Some need a few extra seconds to get gooey.
Any tips for kids to help let them spread the butter and layer the fillings supervised. They love watching the flip and seeing cheese stretch. It makes them proud to eat what they made.
Why does my cheese not melt right away you might need to rest your meat earlier so the top slice is warm. The protein rest step helps the heat move through. Also cover the pan for a few seconds if your stovetop is cool.
With these hacks you can take a simple grilled sandwich to new heights of flavor. Just remember that slow and steady heat low and slow flips and rest time are the real keys. Now fire up that skillet and get ready to taste your best sandwich yet.
Grilled Sandwich
Ingredients
Equipment
Method
- Place bread slices on a cutting board. Spread a thin layer of softened butter evenly over one side of each slice.
- Flip the bread slices over (buttered side down). Lay one slice of cheddar and one slice of mozzarella cheese on two of the bread slices. Add tomato slices and ham or turkey, if using. Sprinkle with dried herbs, salt, and pepper.
- Top each with the remaining bread slices, buttered side facing out.
- Preheat skillet over medium heat. Place sandwiches in the pan.
- Cook for about 3-4 minutes on each side, pressing gently with a spatula, until bread is golden brown and cheese is melted.
- Transfer the grilled sandwiches to a cutting board. Let them rest for 1 minute, then slice and serve warm.
- For extra crispiness, use a cast-iron skillet and press the sandwich down as it cooks.
- Consider swapping the cheese or fillings according to your preferences—add spinach, grilled vegetables, or use whole grain bread for variety.
- Serve with a side of soup or salad for a heartier meal.